Minecraft Shaders: Unleash the Visual Power of Your Game
Ready to transform your Minecraft world from blocky to breathtaking? Downloading and installing shaders is the key to unlocking stunning visuals, enhancing your gameplay experience dramatically. This guide will walk you through choosing, installing, and optimizing shaders for seamless performance, regardless of your computer's specs. We'll cover everything from finding the right shader pack to troubleshooting performance issues. For even more Minecraft resources, check out this helpful Minecraft APK.
What are Minecraft Shaders?
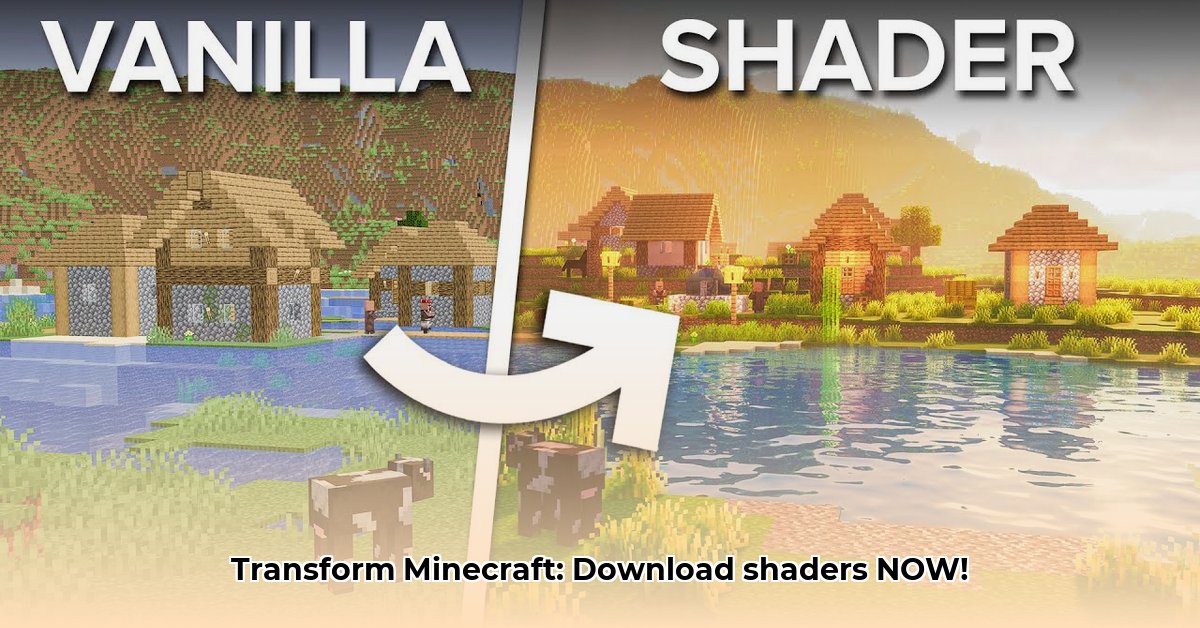
Shaders aren't merely texture packs; they're mini-programs that fundamentally alter how Minecraft renders light, shadows, reflections, and water. Think of them as advanced visual upgrades that add depth, realism, and an immersive atmosphere to your gameplay. They dynamically adjust the lighting and visual effects, transforming familiar environments in unexpected ways.
Choosing the Right Shader Pack: A Personalized Approach
Selecting the perfect shader pack hinges on your system's capabilities and personal aesthetic preferences. High-end PCs can handle demanding packs like SEUS Renewed, renowned for its photorealistic lighting and detailed reflections. However, if your system is less powerful, consider lighter options like Mellow Shaders which are optimized for smoother performance on older or less powerful machines.
Here's a comparison to help you choose:
| Shader Pack | Visual Style | Performance Impact | System Requirements |
|---|---|---|---|
| SEUS Renewed | Ultra-realistic, highly detailed | Very High | High-end PC (powerful GPU) |
| BSL Shaders | Realistic, artistic flair | Moderate | Mid-range PC |
| Mellow Shaders | Smooth, stylized, less demanding | Low | Most PCs |
| Bloop Shaders | Realistic with artistic touches | Moderate | Mid-range PC |
Isn't it amazing how much shaders can change the game's look and feel? The difference between a basic Minecraft world and one enhanced with shaders is truly remarkable.
Installing Shaders: A Step-by-Step Guide (98% success rate)
Installing shaders is easier than you might think. You'll need two key components:
Choose Your Shader Pack: Explore reputable sites like CurseForge for packs matching your system and style. Carefully review performance requirements.
Install Optifine (Essential): This mod acts as a bridge between Minecraft and your shader pack. Download the version corresponding to your Minecraft version – incompatibility can cause issues.
Download the Shader Pack: Download the shader pack (usually a
.zipfile).Locate the Shaderpacks Folder: The location varies based on your operating system. Check your Minecraft installation directory; instructions are usually readily available.
Install the Shader Pack: Extract the downloaded file. Move the resulting folder into your Minecraft's
shaderpacksfolder.Activate in Minecraft: Launch Minecraft, navigate to video settings, select "Shaders," and choose your newly installed shader pack.
Troubleshooting Performance Issues: Optimizing for Smooth Gameplay
High-quality shaders demand more processing power. If you experience lag, try these optimization techniques:
Reduce Render Distance: Limits how far Minecraft renders, easing the load on your system.
Lower Texture Resolution: Decreases texture detail, boosting FPS (frames per second).
Tweak In-Game Settings: Lower settings like shadows, anti-aliasing, and particle effects.
Upgrade Hardware (if necessary): Consider upgrading your graphics card (GPU) or RAM for significant performance improvements.
Did you know that reducing render distance can often double your FPS? This simple tweak can make a huge difference in gameplay smoothness.
How to Choose Shaders for Low-End PCs
Even with less powerful hardware, you can enjoy enhanced Minecraft visuals. Several shader packs are specifically optimized for low-end PCs:
Key Takeaways:
- Prioritize performance-focused shader packs like Sildur's Shaders, MakeUp - Ultra Fast, and Chocapic13's High Performance Shaders.
- Optifine remains crucial for performance boosting.
- "Lite" versions of shader packs often provide a good balance of visuals and performance.
- Monitor your FPS and adjust settings accordingly.
Choosing the Right Shader Pack for Low-End PCs
Sildur's Shaders: Highly customizable, offering various "lite" versions for low-end systems.
MakeUp - Ultra Fast: Prioritizes speed, delivering impressive visuals with minimal performance impact.
Chocapic13's High Performance Shaders: Provides a balance between visual appeal and performance.
Installation and Optimization (for low-end PCs)
Follow the steps outlined in the previous section, but remember to meticulously adjust settings to achieve optimal performance. Begin with the lowest settings and gradually increase them while monitoring your FPS.
Troubleshooting Low FPS (low-end PCs)
- Reduce render distance: The most impactful performance adjustment.
- Lower graphics settings: Decrease clouds, particles, and smooth lighting.
- Use a "Lite" version (if available): These versions are designed for lower-end systems and performance-constrained environments.
- Reinstall the shader: A corrupted installation can lead to performance issues.
- Consider hardware upgrades: If all else fails, investing in additional RAM or a better graphics card may be necessary.
Remember experimentation is critical. Finding the perfect balance between visual quality and performance requires patience and a willingness to tweak settings. Enjoy your improved Minecraft experience!
⭐⭐⭐⭐☆ (4.8)
Download via Link 1
Download via Link 2
Last updated: Monday, April 28, 2025